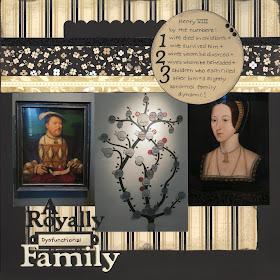
I was originally going to title this layout "Young Henry VIII Tour," but I stumbled across a challenge at More Than Words to use the word family plus numbers on a layout, and I thought it would be fun to create a tongue in cheek layout about Henry VIII's dysfunctional family! Enjoy.
Recipe:
Silhouette Level 2 papers & My Stickease
Black, Bamboo & Colonial White cardstock
Black ink
Black marker
Gold metallic marker
Black Shimmer Trim
Black & gold brads
Cricut Art Philosophy cartridge: title, scalloped border
Pattern: EMS Sketch Challenge 38
Challenges: Heart 2 Heart Pun Intended (I'm not positive the use of "royally" is a pun, but it certainly is a play on words); More Than Words Family + numbers
Pages
▼
Sunday, December 31, 2017
Saturday, December 30, 2017
Base Court Layout
We took tons of pictures at Hampton Court, so I decided to scrapbook a selection of them traditionally while placing the coordinating photos in photo storage pages, thus saving me lots of time! Here are a few of the base court, the first courtyard you enter after proceeding through the main gateway. I love how the Clementine papers I used pick up the beautiful tones of the buildings and also provide some contrasts so the photos stand out against them.
Recipe:
Live Inspired, Felicity Alphabet & Spot On Backgrounds stamp sets
Clementine Level 2 papers
Creme Brulee & Cashmere cardstock
Creme Brulee, Cashmere, Saddle, Twilight & Sorbet ink
Bronze Shimmer trim
Blue Enamel &Glitter Dots
3-D foam tape
Pattern: Sketch-n-Scrap #142
Recipe:
Live Inspired, Felicity Alphabet & Spot On Backgrounds stamp sets
Clementine Level 2 papers
Creme Brulee & Cashmere cardstock
Creme Brulee, Cashmere, Saddle, Twilight & Sorbet ink
Bronze Shimmer trim
Blue Enamel &Glitter Dots
3-D foam tape
Pattern: Sketch-n-Scrap #142
Friday, December 29, 2017
Hampton Court Layout
It was a real treat to go to Hampton Court Palace since I had read so much about it. Seeing the actual red-brick towers brought to life the stories I had read but had trouble picturing until then. For the layout, I chose the sketch I had created in September for Splitcoast Stampers.
The Sketch:
My Layout:
Recipe:
Dreams, Chairs to You & Victory stamp sets
Florentine Level 2 papers
Bamboo, Autumn Terracotta & Cocoa cardstock
Cocoa &; Twilight ink
Cocoa marker
Bronze ShinHan Touch Twin marker
White gel pen (Sakura)
Bitty Sparkles
Cricut Wall Decor & More cartridge: monograms, crown
Cricut Art Philosophy: lowercase title letters
Pattern: Splitcoast Stampers Sketch17Sept
Wednesday, December 27, 2017
Going Underground Layout
One of the great things about London (at least to this Los Angeles resident) is that you can get just about everywhere using public transportation! Combining our oyster card and our London Pass got us even to such far flung places as Hampton Court for a day's sightseeing. We took several photos of the Underground, but only a few came out, so I scrapbooked them using a sketch from The Studio Challenges, turned on its side and featuring two 4' x 6" photos. I had lots of fun with the design, especially the arches that represent the underground station.
Recipe:
Distressed Backgrounds stamp set
You Rock Level 2 papers
Champagne, Olive, Ruby & White Daisy cardstock
Goldrush, Olive, Outdoor Denim, Chocolate & Desert Sand ink
Chocolate marker
Outdoor Denim baker's twine
Ruby chevron washi tape
London Stickers (Stickopotamus)
Cricut Artiste cartridge: title, large arrow
Cricut Art Philosophy cartridge: small arrow, tag
Tuesday, December 26, 2017
Tea for Two Layout
My Christmas present seems to be the return of my mojo from wherever it was hiding! I finally finished up a layout that's been sitting on my desk for weeks, and I am pretty happy with the result. It's a non-Christmas layout using some Christmas colors in honor of the season. Under the picture with the tab, I added hidden journaling about how much I loved the fresh pot of tea provided with our breakfast each morning.
Recipe:
Tea Time & It's Your Day stamp sets
Sweetheart, Heartstrings, Emporium & For Always Level 2 papers
Black, Chocolate, Champagne & White Daisy cardstock
Black, Cranberry, Sweet Leaf & Chocolate ink
Black marker
Red glitter gems
Cricut Art Philosophy cartridge: tab, ring, lowercase letters
Cricut Wall Decor & More cartridge: T & 2
Cricut Artbooking cartridge: arrows
Pattern: Sketches in Thyme #305
Challenges: Another Freaking Scrappy Challenge - I used green, red, and the word happy
Saturday, December 16, 2017
Angry Birds Journaling Card
Wow, over a month since my last post. . . . My creative mojo is not visiting very often recently. With all that's going on in my life, I'm almost ready to close down my blog and call it a day, but then some inspiration unexpectedly strikes and I create something I want to share, so don't give up on me yet!
Today, I was sorting through a box of papers and found the gift list from my son's Angry Birds birthday party. I had already scrapped the party (see the layout here) but wanted to add the gift list somehow, so I used a sketch from Sketches in Time Project Life Style to make a journaling card to add to the photo pocket page. The list continues on the back so I added a pull tab to one side of the card. The piggy was freehanded and pieced together- very old-school style!
And here's the card on my pocket page.
Recipe:
Elemental Level 2 papers
Clover Meadow, Pear, Colonial White & White Daisy cardstock
Cranberry, Pacifica, Pear & Bamboo ink
Black marker
Shin Han Touch Twin marker Sap Green
Cricut Art Philosophy cartridge: eggs
Cricut Artbooking cartridge: grass
Saturday, November 4, 2017
Pub Layout
I'm back!!! School and soccer season started and my mojo apparently fell off the end of the earth, but today I actually woke up feeling crafty, so here's the result. Two challenge blogs were asking to see layouts about something or someone we're thankful for, so I included my thankful moment in my journaling: "It was fun to see the reserved Londoners let their hair down in the pub near our hotel, but the smooshed peas certainly made me thankful for the food at home!" Smooshed peas seemed to be a staple food that accompanies fish and chips in England, and it's something I will be thankful never to eat again! On a side note, the fish and chips at the Prince Albert Pub were the best we had in London.
Recipe:
Urban Alphabet stamp set
For Always Level 2 papers
Black & Crystal Blue cardstock
Crystal Blue & Versamark ink
Black marker
Gold Metallic marker
Gold embossing powder
Gold brads (from my stash)
Triangles washi tape
Cricut Art Philosophy cartridge: pennants
Pattern: Stick It Down November single page sketch (slightly modified)
Challenges: Another Freaking Scrappy Challenge use words of thanks; Colorful Creations thankful challenge
Friday, August 11, 2017
Welcome Baby Card
I'm not a huge card maker these days because I have a large stash of cards already that I always forget to give away - LOL! However, I'm going to a baby shower tonight that required a special card. My hubby and I decided to purchase the crib for his cousin's baby since it would be something that could be used for years (it later converts into a regular bed). It's being shipped direct to the mom and dad, but I wanted to have something in hand for the shower, so I bought a copy of Goodnight, Moon, an all-time favorite in our house, to give at the shower. So of course, the card had to coordinate with the book, right? I copied the technique I used last week on my pirate layout to create the background, and I even lifted the color scheme since I liked it so much.
Recipe:
Welcome Baby, Lucky & Tiny Typewriter stamp sets
Cashmere, Chocolate & White Daisy cardstock
Sky, Crystal Blue, Sorbet, Cashmere, Chocolate & Whisper ink
Gold Metallic marker
Sorbet grosgrain ribbon
Liquid Glass
3-D foam tape
Cricut Artisty cartridge: moon & stars
Pattern: Sketch-n-Scrap card sketch #103 (love this sketch and will be saving it to re-use!)
Thursday, August 10, 2017
Birthdays Are Better with Buddies Layout
It's sketch time over at Splitcoast Stampers, so here's my new sketch and sample layout for August. I love to pile lots of photos on my layouts, but I recognize that may not be everyone's style, so feel free to just use the basic background and add as many pictures as you need if you use the sketch. And don't forget to let me know you used the sketch so I can check it out!
The sketch:
My layout:
Recipe:
It's Your Day, Perfect Fit Birthday & Holiday Hoopla stamp sets
Jeepers Creepers Level 2 papers
Lagoon, Pear & White Daisy cardstock
Lagoon, Pear, Sunset, Honey & Black ink
Pear & Black brads
Cricut Artiste cartridge: "birthday"
The sketch:
My layout:
Recipe:
It's Your Day, Perfect Fit Birthday & Holiday Hoopla stamp sets
Jeepers Creepers Level 2 papers
Lagoon, Pear & White Daisy cardstock
Lagoon, Pear, Sunset, Honey & Black ink
Pear & Black brads
Cricut Artiste cartridge: "birthday"
Cricut Artbooking cartridge: "buddies"
Cricut Artistry cartridge: tab
Challenges: Heart 2 Heart friendship challenge (I plan to add captions with the names of my son's friends on them after I post this online)
Wednesday, August 2, 2017
EMS Sketch Challenge 65 - A Pirate's Life for Me Layout
It's been a couple of months since I managed to create a sketch for my blog, but I really needed a design for some pictures so that got my creativity kick-started. If you're able to use the sketch, please link up your post below!
The sketch:
I had lots of fun creating the background of my layout, starting with brayering Sky ink on white cardstock, then sponging on hints of Sorbet, Crystal Blue, and Cocoa. I then stamped the corners, and my canvas was ready for all the other elements to be added.
Recipe:
Live Inspired, Lucky, You and Me & Universal Backgrounds stamp sets
Majestic Blue Level 2 papers
Cocoa, Indian Corn Blue, Bamboo & White Daisy cardstock
Sky, Crystal Blue, Outdoor Denim, Bamboo, Cocoa & Sorbet ink
Outdoor Denim marker
White gel marker (Sakura)
Cocoa brads
Ribbon from my stash
Cricut Wall Decor & More cartridge: skull, monograms, ship, swirls, compass
Cricut Art Philosophy cartridge: tag, title (lowercase letters), scalloped border
Challenges: Fantabulous Cricut Challenge anything goes (lots of "anythings" on this layout!)
EMS SKETCH CHALLENGE 65 - Link up your layout here!
Monday, July 31, 2017
Explore Historic London Layout
Back to my London layouts, this time with one from the Museum of London. I used up some stash papers and stickers from CTMH on this one, so I'm pretty happy about that! The layout ended up being pretty hard to scan because of the thickness of the pearls, but hopefully you get a good idea of what it should be IRL.
Recipe:
Tiny Typewriter & Universal Backgrounds stamp sets
Florentine Level 2 papers & My Stickease
Twilight, Creme Brulee, Goldrush, Olive, Cocoa & Bamboo cardstock
Twilight, Goldrush, Olive & Cocoa ink
Chocolate marker (Zig)
Mocha Opaques pearls
Olive embroidery floss
3-D foam tape
Cricut Wall Decor & More cartridge: explore
Cricut Artistry cartridge: arrows
Cricut Accent Essentials cartridge: arrows
Pattern: Let's Scrap 7-15-17
Challenges: Heart 2 Heart In Stitches challenge; The Studio Challenges In Stitches challenge; More Than Words July challenge
Saturday, July 29, 2017
Minion Cupcakes Layout
Another layout for my son's Despicable Me party! Cupcakes are much easier for me to embellish than cakes are, so I enjoyed the challenge of creating these little minion cupcakes for my son's Despicable Me party. This layout from Splitcoast Stampers got me rolling for the design of the layout, and then I adapted it to work with my photos.
Recipe:
A Typeface stamp set
Dreamin' Big Level 2 papers
Saffron, Juniper, Poppy & White Daisy cardstock
Saffron, Juniper, Poppy, Goldrush & Slate ink
Black marker
Decorative brad from my stash
Cricut Artistry cartridge: title, tab, stars
Challenges: Heart 2 Heart fabulous fonts (I used a mix of a Cricut cut and stamping for my title)
Tuesday, July 25, 2017
Despicable Me Party Layout
Since my family went to see the new Despicable Me movie this weekend, I thought I'd take a break from my London vacation layouts and create my final layout for my son's Despicable Me birthday party. I started out with a sketch from Sketch-n-Scrap, added some really old papers, and topped it off with a leftover minion from the batch I designed for the invitations.
Recipe:
The Summer Stack patterned papers (DCWV)
Dutch Blue, Hollyhock & Honey cardstock
Dutch Blue, Hollyhock & Honey ink
Black marker
Cricut Artiste cartridge: title
Cricut Artistry cartridge: balloon
Pattern: Sketch-n-Scrap #132
Challenges: Another Freaking Scrappy Challenge use old paper from your stash (mine is 10 years old +!); Colorful Creations color combo (mine has a bit more green than the original color combo, but hopefully it's close enough); Fantabulous Cricut Challenge anything goes
For the Minion recipe, see here!
Saturday, July 22, 2017
London from Above Layout
I'm not exactly zipping through my London layouts, but they are slowly getting done. Here's another one from our trip to St. Paul's Cathedral. Having injured my knee right before we left on our trip, I was not up to climbing the 528 steps to get to the Golden Gallery on the exterior of the dome, even with a great view like this in store, so my hubby took lots of pictures for me to scrapbook instead! Many thanks to my Splitcoast Stampers buddy Lela, whose layout I scraplifted, although I made some modifications to fit my panoramic pictures.
Recipe:
Jennifer's Hand Alphabet & Take Note stamp sets
Jackson Level 2 papers
Juniper, Glacier, Barn Red & Colonial White cardstock
Juniper, Glacier, Barn Red & Cocoa ink
Barn Red marker
Barn Red Bigger Brads
Colonial White brads
White Daisy baker's twine
Bronze shimmer trim
Cricut Art Philosophy cartridge: banner
Cricut Artbooking cartridge: notebook paper
Challenges: Splitcoast Stampers Tour de France challenge 4 (pick a favorite layout and scraplift it); Lasting Memories outdoor adventures challenge (okay, this may be cheating a little, but these pictures were certainly taken outdoors, and it was quite an adventure to get to the top, so . . . ); Scrap Our Stash tic-tac-toe (I chose the column on the right, with twine, stamping, and a banner).
Sunday, July 16, 2017
All Around the Cathedral Layout
I finally got to work on some scrapbooking today after several weeks away, and these postcards from St. Paul's Cathedral were beckoning! I already had an intro page plus a pocket page with some journaling for St. Paul's, so I kept the writing on this one to a minimum. In keeping with my previous page, the title is inspired by the song "Feed the Birds" from Disney's Mary Poppins. The interior of the cathedral was as beautiful as the exterior, and we really enjoyed our tour, but since you couldn't take pictures inside, we had to purchase some postcards from the gift shop. I used my July sketch from Splitcoast Stampers for the design, and adapted it to create a row of arches with silhouettes from the life of Christ in them. I also created a pocket on the left hand page to hold the extra postcards. All the postcards are mounted using photo corners so that you can slide them out and see what's written on the back.
The sketch:
My layout:
Recipe:
Paper Fundamentals Basic Assortment patterned paper
Cashmere, Lagoon, Sapphire, Glacier & White Daisy cardstock
Lagoon & Glacier ink
Gold brads
Photo corners (Pioneer)
Cricut New Testament cartridge: life of Christ figures
Cricut Art Philosophy cartridge: title, arches
Pattern: Splitcoast Stampers Sketch17Jul
Challenges: Heart 2 Heart Oh the Places You'll Go challenge (we went to St. Paul's, of course!); The Studio Challenges No People (although there are statues and die-cuts of people, there are no living people on this layout, quite a change for me)
Friday, June 23, 2017
Feed the Birds Layout
When I think of Saint Paul's Cathedral in London, the song "Feed the Birds" from Disney's Mary Poppins movie is the first thing that comes to mind, so I made sure we took some pictures of the pigeons when we were visiting St. Paul's! This is my first St. Paul's layout, accompanied by a photo storage page, and features a few pictures of the exterior. For the bird die-cut next to the title, I actually used a quail cut, but I snipped off the plume on top of his head so he resembled a pigeon.
Here's my journaling card for the coordinating pocket storage page. I started with a sketch but changed the orientation to fit with my other photos. FYI: the dots on the ground are supposed to be bird seed, not bird poop! I realized after I added them that there could be some confusion there. . .
And these photos of the exterior of St. Pauls will also go in the pocket page.
Recipe:
Striped paper (MME)
Chocolate, Cashmere, Whisper, Sunset & Black cardstock
Chocolate ink
Brown and Black markers (Zig)
Tan ribbon (from my stash)
Cricut Noah's ABC Animals cartridge: title, bird
Cricut Art Philosophy cartridge: tags
Cricut Artiste cartridge: border
Pattern: Let's Scrap 6-15-17 sketch (left side only)
Journaling Card Pattern: Sketches in Thyme Project Life Style #75
Challenges: Bitten By the Bug 2 Birds of a Feather challenge
Saturday, June 17, 2017
Gear Up Father's Day Card
I had to whip up a quick Father's Day card and decided to use stuff I already had on my desk. I had cut out a bunch of gears as decorations for vacation Bible school (Maker Fun Factory, anyone?), and thought gears went great with a masculine theme, so I used the left-overs and added some stamped gears and a sentiment. Easy peasy, but hopefully Dad will like it! I even stamped a coordinating envelope.
Recipe:
Gear Up, Holiday Tags & Marquee Uppercase stamp sets
Clover, Sunflower, Dutch Blue & White Daisy cardstock
Ruby, Desert Sand & Dutch Blue ink
Cricut Artiste cartridge: gears
Challenges: Bitten By the Bug 2 Father's Day theme; Fantabulous Cricut Challenge masculine/Father's Day theme
Recipe:
Gear Up, Holiday Tags & Marquee Uppercase stamp sets
Clover, Sunflower, Dutch Blue & White Daisy cardstock
Ruby, Desert Sand & Dutch Blue ink
Cricut Artiste cartridge: gears
Challenges: Bitten By the Bug 2 Father's Day theme; Fantabulous Cricut Challenge masculine/Father's Day theme
Thursday, June 8, 2017
Exploring London on Foot Layout
My husband and I recently took a trip to London as a treat for surviving and enjoying 25 years of marriage, so I got a bunch of photos printed up and am going to try to scrapbook them all before I forget the details of our trip. Here's the first layout! We stayed at the Portobello Hotel, a cute boutique hotel in Notting Hill, and every day we would walk to the Notting Hill Gate tube station, about a ten minute walk. It wasn't quite as fun walking back to the hotel in the evening when we were tired, but we did get to know Kensington Park Road pretty well. For the layout, I tried to recreate the feel of the street where the hotel was located. The facing page will be a photo storage page with six photos of the area, so I will post them here so you can get a feel for our whole trip!
Recipe:
Around the Block stamp set
Sky, Garden Green, Goldrush, White Daisy, Slate & Black cardstock
Black, Garden Green, Goldrush, Whisper & Bamboo ink
White gel marker (Sakura)
Gold metallic marker
Black marker
Shin-Han Twin Touch markers
Cricut Artistry cartridge: house
Pattern: EMS Sketch 31
The weather was gorgeous so all the foliage was looking its best. |
My hubby really loves trees so we took lots of pictures of the beautiful trees in London! |
Recipe:
Around the Block stamp set
Sky, Garden Green, Goldrush, White Daisy, Slate & Black cardstock
Black, Garden Green, Goldrush, Whisper & Bamboo ink
White gel marker (Sakura)
Gold metallic marker
Black marker
Shin-Han Twin Touch markers
Cricut Artistry cartridge: house
Pattern: EMS Sketch 31
Saturday, June 3, 2017
Up a Lazy River Layout
I'm back! It's been two months since I posted a layout, but hopefully the mojo will continue flowing and I will have lots to share this month. I'm starting scrapping my London vacation today, but first here's a Yosemite layout that I finished up this morning. The pictures aren't the best, but I had fun scraplifting this layout from Trish at Splitcoast Stampers. The way the frames were laid out really caught my eye, so I tried to duplicate that, along with the circle and the photo placement. Thanks for the inspiration, Trish!
Recipe:
Back Country Level 2 papers & My Stickease
Outdoor Denim, Barn Red & Whisper cardstock
Outdoor Denim & Olive ink
Outdoor Denim marker
Marine Blue Shin Han Twin Touch marker
Outdoor Denim & Olive craft buttons
Recipe:
Back Country Level 2 papers & My Stickease
Outdoor Denim, Barn Red & Whisper cardstock
Outdoor Denim & Olive ink
Outdoor Denim marker
Marine Blue Shin Han Twin Touch marker
Outdoor Denim & Olive craft buttons
Olive & White embroidery floss
Cricut Artistry cartridge: title
Challenges: The Studio Challenges recipe - I managed to include hand sewing, fussy cutting (the trees), frames, and buttons
Tuesday, May 16, 2017
I'm still here!
I've always been frustrated when a blog just stops posting and no explanation is given, so since I haven't posted in over a month, I thought I'd just pop in and let everyone know I haven't given up bloggin! April and May have been extremely busy months for me, with my daughter's birthday party and a two week trip to England to plan, and now I'm recovering from jet lag while catching up on all the things that happened on the home front while I was gone. Throw in my husband's and my birthdays and Mother's Day, plus starting up a new Bible study and joining the worship team at church, and you have the recipe for slight exhaustion. Scrapbooking is still on my mind (I have tons of pictures from London to scrap), but I'm not feeling very inspired at the moment. All that to say, I'm on a little break but will be back at the beginning of June with a new sketch for everyone! Enjoy the rest of May.
Tuesday, April 4, 2017
Glacier Point Layout
One highlight of our Yosemite visit was a trip to Glacier Point to check out the beautiful views. I scrapbooked a few favorite photos on this layout and then added twelve more photos to a photo storage page. I'm hosting the monthly scrapbook challenge over at Splitcoast Stampers, so I created this layout for my Stash Busters challenge to use 1 piece of ribbon, 2 colors of cardstock, 3 photos, 4 pieces of bling, and 5 patterned papers. Feel free to play along with us!
Recipe:
Skylark Level 2 papers
Colonial White & Kraft cardstock
Lagoon, Sweet Leaf & Desert Sand ink
Snapshot Complements
Hopscotch PML journaling card
Mocha Opaques pearls
Lagoon ribbon
Cricut Artiste cartridge: title
Recipe:
Skylark Level 2 papers
Colonial White & Kraft cardstock
Lagoon, Sweet Leaf & Desert Sand ink
Snapshot Complements
Hopscotch PML journaling card
Mocha Opaques pearls
Lagoon ribbon
Cricut Artiste cartridge: title
Monday, April 3, 2017
Exploring the Southwest Layout
For my new Splitcoast Stampers Sketch for April, I actually started with a layout and loved it so much, I decided to create a sketch so I could use the arrangement of the photos again! I know this is a picture-heavy sketch, but you can always delete a few photos if you don't need that many.
FYI: I'm also hosting a month-long scrapbooking challenge over at Splitcoast Stampers, so if you need some inspiration, please head on over and check out the fun!
The sketch:
My layout:
Recipe:
Diverse Backgrounds stamp set
Lucky Level 2 papers
Bamboo & Sky cardstock
Desert Sand, Sky, Outdoor Denim & Olive ink
Chocolate marker (Zig)
My Crush Wildwood Assortment "Documented" card & stickers
Enamel and Glitter Duos blue dots
Cricut Art Philosophy cartridge: heart
Cricut Alphabet: title
Tuesday, March 28, 2017
Cat Party Card
My daughter asked for a cat party for her birthday, so the first step was making her invitations. I started with a cute card sketch from Atlantic Hearts challenge blog but, since I wanted to go vertical on my card base, I tightened up the design by moving the circles together. The card went through several revisions and I ended up simplifying it a bit because I just couldn't face hand cutting glitter tape for 30 cards (can anyone relate?) but I'm pretty happy with the final result!
Recipe:
Fanfare, Welcome Baby & One Way Borders stamp sets
Laughing Lola Level 2 papers
Slate, Whisper, Crystal Blue & White Daisy cardstock
Crystal Blue, Thistle & Black ink
Black & Gold Metallic markers
Purple Glitter Gem
Cricut Artistry cartridge: banner
Cricut Chore Chart cartridge: cat
Challenges: Bitten By the Bug 2 banner or sign challenge
Monday, March 27, 2017
Taft Point Layout
Taft Point at Yosemite is a bit of a hike, but always offers amazing views that make me glad I went! I created the base layout at my scrapbook retreat, but it needed some extra pizzazz, so when I got home, I decided to play along with some challenges to add punched borders, chipboard, and baker's twine.
Recipe:
Everyday Celebration Level 2 papers
Chocolate, Sweet Leaf & Colonial White cardstock
Chocolate, Sweet Leaf & Dutch Blue ink
Dutch Blue marker
Chocolate baker's twine
Nutmeg Memories chipboard (MME Indie Chic)
Cricut Stone Script cartridge: title
Fiskars scalloped border punch
Pattern: EMS Sketch Challenge 2
Challenges: Scrappy Friends Bingo challenge (I chose the row with border punch, green, ink, chipboard shape & twine); Another Freaking Scrappy Challenge chipboard & something old from your stash (my old was the papers I've been hoarding for at least five years)
Saturday, March 25, 2017
Washburn Point Layout
Yosemite is so beautiful that all our pictures are naturally beautiful as well! For this layout, I chose to accent the blues in the pictures by using blue cardstock, blue ink, and patterned paper with blue and earth tones. The butterflies were a playful touch inspired by the March More Than Words challenge.
And here's my layout. I also used a stamped quote from Helen Keller about "beautiful things."
Recipe:
Beautiful Things & Treasure Life stamp sets
Dreamin' Level 2 papers
Pacifica, Crystal Blue, Chocolate & Colonial White cardstock
Pacifica, Crystal Blue, Sky, Chocolate & Desert Sand ink
Black marker
Cricut Jasmine cartridge: title
Cricut Artistry cartridge: butterflies
Cricut Art Philosophy cartridge: flourish
Thursday, March 23, 2017
Yosemite 2012 Layout
It feels like I've scrapbook Yosemite pictures many times before, so it will be a challenge to keep this batch of pictures from our 2012 vacation looking fresh, but I am going to give it a try! Here's my intro page for the vacation, and I included a fun little envelope with hidden journaling about driving to Yosemite and our first stop there. Any guesses where these photos were taken?
And here's the open envelope with the card:
Recipe:
Beautiful Things stamp set
Huntington Level 2 papers
Whisper & Colonial White cardstock
Olive, Desert Sand, Chocolate & Cashmere ink
Sap Green, Clay & Cerulean Blue Shin Han markers
My Crush Wildwood Assortment
Chocolate Organdy ribbon
Chocolate metal arrow & brad
3-D foam tape
Cricut Art Philosophy cartridge: title
Pattern: Sketches in Thyme #269
Wednesday, March 22, 2017
Monument Valley Layout
So close to finishing my Colorado vacation scrapbook! Here's my next to last layout . . . We spend a few hours at Monument Valley, but since we came during the windy season, there was so much dust in the air that it was hard to see anything.
Recipe
Flight of the Arrows & Friendship Alphabet Small stamp sets
Back Country Level 2 papers & My Stickease
Goldrush, Outdoor Denim, Colonial White cardstock
Goldrush, Outdoor Denim, Barn Red ink
Outdoor Denim marker
Outdoor Denim & Colonial White craft buttons
Outdoor Denim& Autumn Terracotta maker's twine
Circuit Art Philosophy cartridge: tag
Pattern: EMS Sketch Challenge 42
Tuesday, March 21, 2017
Blastoff Layout
One of the kids' favorite activities from Elliot's Despicable Me birthday party was making and launching their own rockets. For the layout showing the event, I used the right half of the Splitcoast Stampers March sketch, and added some fun details like a stamped rocket blasting off to the moon and a countdown to launch.
Recipe:
Atomic Caps, Atomic Numbers & Outta This World stamp sets
Animal Cookies Level 2 papers
Honey, Sunset, Whisper & White Daisy cardstock
Dutch Blue, Tulip, Sunset, Whisper & Slate ink
Dutch Blue, Black & Gold metallic markers
Recipe:
Atomic Caps, Atomic Numbers & Outta This World stamp sets
Animal Cookies Level 2 papers
Honey, Sunset, Whisper & White Daisy cardstock
Dutch Blue, Tulip, Sunset, Whisper & Slate ink
Dutch Blue, Black & Gold metallic markers
Carmine & Clay Shin Han Twin Touch markers
Red enamel dots
3-D foam tape
Cricut Artiste cartridge: rocket
Cricut Art Philosophy cartridge: arrows
Challenges: Lasting Memories Lots of Number + Birthday themed layout challenge (I was inspired to add the countdown to my title)
Monday, March 20, 2017
Villains in Training Layout
No party would be complete without games, so for my son's Despicable Me birthday party, we planned games around the idea of getting ready to be a super villain! We created an obstacle course for the kids to conquer, plus we had a few other games based on the movie, like the unicorn horn ring toss inspired by Agnes' love of unicorns. Using the left side of the March sketch I had made for Splitcoast Stampers, I created a layout featuring a few pictures from the game time and then added a photo storage page with a few more pictures.
The sketch:
My layout:
As part of my photo storage page, I used a sketch from Sketches in Thyme, Project Life Style to come up with a journaling card. I wanted to include a photo, so I rearranged and resized some of the elements of the sketch, and I added that adorable unicorn die-cut and a quote from Agnes: "He's so fluffy, I'm gonna die!" As you can probably tell, the birthday boy got the honor of wearing the unicorn horn for the ring toss. He wasn't thrilled, but he was a pretty good sport about it!
The sketch:
My journaling card:
And here's my completed photo storage page:
Recipe:
Atomic Caps, Atomic Lower Case & Spot On Backgrounds stamp sets
Animal Cookies Level 2 papers
Honey, Dutch Blue & White Daisy cardstock
Dutch Blue, Tulip, Honey & Sunset ink
Dutch Blue, Black & Gold metallic markers
Cricut ZooBalloo cartridge: unicorn
Cricut Art Philosophy cartridge: arrows
Heart punch (EK Success)
Challenges: Fantabulous Cricut Challenge Blog anything goes (I used several Cricut cuts!)
The sketch:
My layout:
As part of my photo storage page, I used a sketch from Sketches in Thyme, Project Life Style to come up with a journaling card. I wanted to include a photo, so I rearranged and resized some of the elements of the sketch, and I added that adorable unicorn die-cut and a quote from Agnes: "He's so fluffy, I'm gonna die!" As you can probably tell, the birthday boy got the honor of wearing the unicorn horn for the ring toss. He wasn't thrilled, but he was a pretty good sport about it!
The sketch:
My journaling card:
And here's my completed photo storage page:
Recipe:
Atomic Caps, Atomic Lower Case & Spot On Backgrounds stamp sets
Animal Cookies Level 2 papers
Honey, Dutch Blue & White Daisy cardstock
Dutch Blue, Tulip, Honey & Sunset ink
Dutch Blue, Black & Gold metallic markers
Cricut ZooBalloo cartridge: unicorn
Cricut Art Philosophy cartridge: arrows
Heart punch (EK Success)
Challenges: Fantabulous Cricut Challenge Blog anything goes (I used several Cricut cuts!)