Showing posts with label Say It In Style. Show all posts

Thursday, May 14, 2026

So Very Grateful Card

May seems to be my month to make cards, so here is another one I created. It's the end of my daughter's final softball season, and I am so thankful for two of the moms who drove the girls (including mine) to so many practices and games, so I decided to make them each a thank you card and include a gift card. I'm trying to use some of my old SU woodie stamps, so I pulled out the So Very sentiment and made it the focal point of this card.

Recipe:
So Very stamp set (SU)
Say It In Style stamp set
Gingham paper (from my stash, source unknown)
Sky & White cardstock
Canary, Sky & Bluebird ink
Blue Belle Shimmer Trim
Yellow paper flowers (Recollections)
Tim Holtz Rays stencil (Stampers Anonymous)
Cricut Art Philosophy cartridge: shaped rectangle
Challenges: Just Us Girls #823 Flowers; Stencil Fun Challenges - Anything goes including a stencil (the rays stencil was perfect for this card); If You Give a Crafter a Cookie #216 - I was inspired by the color scheme, the blue gingham, and the flowers).

Sunday, May 11, 2025

Mother's Day Floral cards

I've been posting layouts the last few days, so here's a break to show off some cards I created for Mother's Day. I used the same design and basic supplies for both, but since one is for my mom and one is for my hubby's mom, I wanted to make them slightly different. Can't decide which one I like better!

For my hubby's mom

For my mom

Both cards

Recipe:
Hooray Bouquet (2011) & Say It in Style (2009) stamp sets
Caboodle paper
Capri, Sorbet, Shortbread & White Daisy cardstock
Capri, Sorbet & Honey ink
Clear craft buttons
Creme Brulee baker's twine
Puppy Love Shape Sprinkles (Doodlebug Designs)
Liquid Glass
Cuttlebug embossing folders: Swiss Dot & Little Flowers
Cricut Art Philosophy cartridge: flowers
Circle Double Stitched Steel dies (Art Impressions)
Pattern:  Sketch-n-Scrap Card sketch #285

Challenges: Can You Handle the Pressure? Anything Goes with twist of floral - used a floral embossing folder on one card, plus both have die-cut and stamped flowers; Little Red Wagon #806 Goodbye Yellow Brick Road (use yellow) - the smaller flowers, the baker's twine, and one epoxy heart; Retro Rubber Challenges #254  Sweet Spring Flowers - stamped the flowers and the sentiments, stamps are from 2009 and 2011; If You Give a Crafter a Cookie #204 Pretty flowers - I was inspired by the colors and shape of the cookies, plus I added designs on my flowers because of the designs on the cookies

Saturday, June 18, 2016

Chalk It Up Cards

I'm still planning to post more layouts from my son's kindergarten ABC album, but I also had to create some teacher thank you cards this month. Since I haven't made a card in almost a year, my card box is looking pretty empty, so I decided to make 20 thank you cards using the Just Because card workshop in CTMH's Wishes card making book. I gave a few away before I had time to photograph them, but here are a few more I created.


Recipe:
Thank You, Say It in Style, AP Tags, A Little Everything, A Little Thanks and Kaboom stamp sets
Chalk It Up Level 2 papers
Lagoon, Sorbet, Flaxen, Black & White Daisy cardstock
Lagoon, Sorbet, Flaxen, Black, Whisper & Slate ink
Black & Honey markers
Sorbet ribbon
Black epoxy bubble
3-D foam tape
All the die-cuts were from my pile of left-overs, so I'm not sure what cartridges they come from.

Wednesday, October 14, 2015

Recipe for a Happy Mother's Day Layout

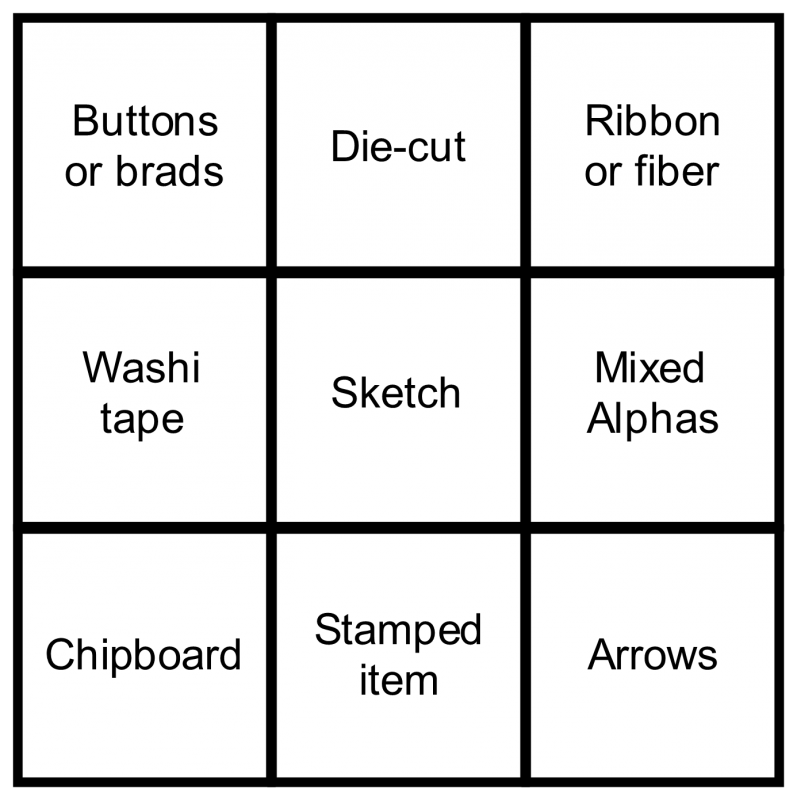
Wednesday is here, and I posted three new challenges on the Splitcoast Stampers Virtual Scrapbook Night forum for any scrapper daring enough to participate! Here's my layout for the Tic-tac-toe challenge. I used the middle column with die-cuts, a sketch, and a stamped item (several, in fact).

Here's the board, just in case you want to play along:
And my layout:
Recipe:
Say It in Style, All the Details, Whooo's Your Valentine & Have a Happy Day stamp sets
Laughing Lola level 2 papers
Laughing Lola Yellow, black, Crystal Blue & White Daisy cardstock
Black, Thistle & Flaxen ink
Black marker
Durables Artisan Studs
White ric-rac (Wrights)
White Daisy embroidery floss
Cricut Art Philosophy cartridge: title box
Cricut Artiste cartridge: hearts
Pattern: Splitcoast Stampers Sketch15Sep3

Friday, March 14, 2014

Lollydoodle Cards

I haven't posted to my blog since last week because I've been super busy creating a fun card workshop using the adorable Lollydoodle papers! I used quite a variety of stamps, some old, some new, and all the die-cuts were cut using the Cricut Art Philosophy cartridge. I was inspired by various sketches and challenges, so hopefully I don't forget to give anyone credit. Here we go.

Pattern: Mojo Monday Sketch 336

Pattern: Sketch-n-Scrap card sketch 21
Challenge: Little Red Wagon - Truly  Dimensional (the butterfly's wings are not adhered, so she is truly 3-D

Pattern: Seize the Sketch 15

Pattern: totally cased from this card by Jen Shults

Pattern: Deconstructed Sketch 142
Challenge: 4 Crafty Chicks - Trees (it's a tree branch, so hopefully that counts!

Recipe:
A True Thank You, Frame It Up, Twitterpated, Hot Diggity, Wild About Love, Say It in Style, Enjoy the Little Things, Happy Birthday, Love You Forever & Holiday Tags stamp sets
Lollydoodle Level 2 papers
Pear, Cotton Candy, Juniper, Slate, Desert Sand  & White Daisy cardstock
Pear, Cotton Candy, Juniper, Slate & Cocoa ink
Cocoa pigment ink
Pear, Cotton Candy, Juniper, Buttercup, Chocolate & Black markers
Pink watercolor pencil (Prismacolor)
Clear embossing powder
Flamingo Dots
Color-Ready seam binding ribbon
Woodgrain washi tape
Silver shimmer trim
Liquid Glass
3-D foam tape
Stripe embossing folder (new from CTMH!)
Swiss Dot & Happy Birthday embossing folders (Cuttlebug)

Saturday, September 8, 2012

Dakota Card Workshop

I haven't posted anything for a while because I've been so busy creating cards for my card workshops. I just finished a workshop last night, and here are the cards we created, 2 each of 6 designs. I wasn't enamored of the Dakota papers when my ladies picked them, but I really enjoyed the challenge of taking papers that weren't "my style" and making cards that were my style. Hope you like them!
Recipe:
Live Inspired, Find Your Style, 4 My Friend, Diverse Backgrounds, Say It In Style, It's Your Day, Hooray Bouquet, Intrinsic Backgrounds, Card Chatter - Birthday, You & Me stamp sets
Dakota Level 2 papers
Pacifica, Barn Red,Sky, Desert Sand, Bamboo, Black & Colonial White cardstock
Pacifica, Barn Red,Sky & Black ink
Color-Ready Seam Binding ribbon
Burlap ribbon
Colonial White ric-rac
Durables Round Studs
Pearl Opaques
Milepost Shapes stars
3-D foam tape
Patterns: Gallery, Delightful Dots, Stay Left, Sentiment Secured, Veranda WOTG, Clementine WOTG
Cricut Art Philosophy cartridge: scalloped border, frame, alphabet collage, "u", arrow, star, sun, flower

Friday, June 15, 2012

Heart 2 Heart Sketch Challenge 17 - Mother's Day Breakfast

Another Heart 2 Heart Sketch coming your way! I saw a comment from someone last week who likes using sketches but gets frustrated when the sketch doesn't include the dimensions, so I though I'd try something new and add the dimensions and placement of the papers. Hopefully the font is large enough for you to see the letters. Happy scrapping, and don't forget to add your link to the Heart 2 Heart blog so we can check out your creation.

The Sketch:

My Layout:

Recipe:
Say It in Style & Friendship Alphabet Small stamp sets
Dotty for You Level 2 papers
Desert Sand, Smoothie & Creme Brulee cardstock
Lagoon, Smoothie & Creme Brulee ink
Grey Wool marker
Just Blooms Paper Shapes - Flutter & Paradise
Colonial White Bigger brads
Clear craft button
Baker's Twine - Paradise
3-D foam tape

Friday, November 18, 2011

Believe Christmas Card Workshop

I have a workshop planned for tonight and one for tomorrow in which we'll be creating these cards. I really love the Believe paper pack but it was harder to work with than I expected, maybe because it's so busy. After several weeks of experimenting, during which I created and discarded a whole set of cards because I wasn't satisfied with them, I came up with these cards. They are based on the Just Because card workshop found in Jeanette Lynton's book Wishes.

Each customer will make two each of five patterns. There are six cards pictured below because the tree and joy cards are actually two different options using the same patterns but two different sides of the same paper, plus different stamps. The ladies will pick which one they prefer, or they can make one of each style.

Like what you see? If you're in the Los Angeles area and want to book a card workshop with me, please contact me using the contact tab on the sidebar of my blog.


Recipe:
AP Seasons, Christmas Love, Say It In Style, December Word Puzzle, Holiday Magic, Shining Star & Holiday Wishes stamp sets
Believe Level 2 papers
Holiday Red, Topiary, Desert Sand & White Daisy cardstock
Holiday Red, Topiary & Chocolate ink
Olive Mini-Medley
3-D foam tape
Xmas Red Stickles (Ranger)
Cricut Art Philosophy cartridge
Paper crimper

Sunday, October 30, 2011

32 Card Worshop Using Elemental

My mom recently asked me to create a bunch of cards to use for a business event, so I used a template designed by talented CTMH consultant Amber Hanson to come up with the following card set! I combined papers from the Elemental Level 2 pack with some random stamped paper, and threw in a bunch of shapes cut from the Cricut Art Philosophy cartridge. I used a lot of different stamp sets and tried to list them all, but I may have missed a few.


Recipe:
Hooray Bouquet, Say It In Style, A Little Everything, AP Seasons, You and Me, It's Your Day, Jingle Borders & Holiday Hoopla stamp sets
Elemental Level 2 papers
Desert Sand, Pacifica, Sorbet, Cranberry, Craft & Colonial White cardstock
Cranberry, Pacifica, Sorbet, Creme Brulee & Desert Sand ink
Sorbet ribbon
Creme Brulee grosgrain ribbon
Natural hemp
Colonial White ric-rac
Twill ribbon
Chocolate buttons
Liquid Glass

Sunday, June 20, 2010

Another Father's Day Card

Happy Father's Day, everyone. Hope you all have plans to celebrate that special man in your life. I finally got around to making a card for my hubby last night. Thanks to all the great inspiration on the Heart 2 Heart blog, I found the cute folded shirt design, combined it with the Mojo Monday Sketch, and voila, the perfect card for my perfect man!


Recipe:
June Word Puzzle & Say It In Style stamp sets
Free Spirit Level 2 papers
Colonial White & Honey cardstock
Indian Corn Blue, Autumn Terracotta, Cocoa & Honey ink
Cocoa grosgrain ribbon
Shades of Chocolate Mini-Medley brad

Friday, April 2, 2010

April LOAD #2 - Fish House Vera Cruz

One of my favorite places to eat fish is the Fish House Vera Cruz. If you're ever in San Marcos, California, it's well worth visiting. The food is delicious! There's always a wait for a table, so the kids entertain themselves by watching the fish in the huge fish tank in the lobby. We went there with friends in March 2007 to celebrate Elliot's second birthday. I was so happy to capture a sweet moment when Elliot was staring fascinated at the fish tank while his older brother gazed solemnly into the camera lens. It's one of my favorite pictures of them.

On this layout, I used the stamp set "At the Aquarium," long discontinued but still one I pull out to scrapbook anything fishy! To highlight the two larger photos, I dry embossed a square around them and then sanded the cardstock to reveal the white core underneath. It's a fun and not too difficult technique to help make your pictures pop!


Recipe:
At the Aquarium, Charm Upper Alphabet, Charm Lowercase Alphabet & Say It In Style stamp sets
Rustic Trails Level 2 papers & My Stickease
Indian Corn Blue & Goldrush cardstock
Cocoa ink
Cocoa marker
Photo hanger
Hemp

Pattern: Unified Whole from Cherish

Wednesday, January 27, 2010

LOAD #27 - Dinner Prep

My parents' church sponsored a community dinner this year for Thanksgiving, and since we were visiting my parents for the week, we got to pitch in and help. Both my mom and sister were wearing blue shirts, but I am a little tired of that color right now (my kids don't seem to wear anything else, but I guess that's my fault since I purchase their clothes), so I decided to try emphasizing some of the other colors in the photos. I couldn't find the perfect B&T paper in my stash, so I decided to create some using my stamps. Recipe Box was a natural choice for a food-oriented layout, and I haven't used Intrinsic Backgrounds much, so I thought I would try that out as well. The buttons and journaling placement are pretty much a direct scraplift from the layout in Imagine.


Recipe:
Friendship Alphabet Large, Recipe Box, Intrinsic Backgrounds & Say It In Style stamp sets
Bamboo, Garden Green & Brown Bag cardstock
Brown Bag, Chocolate, Garden Green & Olive ink
Chocolate marker
Garden Green My Accents
Olive Embroidery Floss

Monday, January 11, 2010

LOAD #11 - Pastor Appreciation Sunday

This is one busy layout! I picked out 15 photos from the many I took at the recent Pastor Appreciation tailgate party at church, and put them on the layout using the Fab 15 pattern. I didn't have much in the way of embellishments for this layout, so I did some alteration. I ran White Daisy embroidery floss over my Blush ink pad to turn it pink, and I dipped a pewter brad in Versamark ink then pink embossing powder before heat setting it to turn it pink. Now I'm off to make a quick card for my hubby. We're going out tonight to celebrate our 18th wedding anniversary!


Recipe:
Alphabet Solos stamps A, C, D, E, I, N, O, P, R, S, T, U & Y
Say It In Style & Thank You stamp sets
White Daisy, Brown Bag, Blush & Star Spangled Blue cardstock
Blush, Star Spangled Blue & Versamark ink
Blush & Brown Bag markers
Pastel Pink embossing powder (JoAnn's)
White Daisy embroidery floss
Vellum (Michaels)
Blush Ribbon Rounds
White Daisy ricrac
Metal rimmed circle tag
Pewter brads

Saturday, December 19, 2009

Mom's Mini Calendar Part 1

I have been toying with the idea of making a calendar for my mom for Christmas, but every time I sat down to work on it, my inspiration flew out the window. Then I was surfing the CTMH consultant bulletin board on Friday and found a cute mini calendar by consultant Anne Chek that really looked do-able. Using her pages as a springboard, the first six pages came together really quickly for me. Thanks for the inspiration, Anne! I used the Animal Cookies Level 2 paper pack and the Animal Cookies Creative Basics on each page. I love the versatility of this pack, with colors that are perfect for a variety of holidays and themes. I'm still working on the other six months, but here's what I've completed so far.


Recipe:
January Word Puzzle, February Word Puzzle, March Word Puzzle, April Word Puzzle, May Word Puzzle, June Word Puzzle, Moments in Time, All Decked Out, Extreme Caps & Say It In Style stamp sets
White Daisy, Moonstruck, Black, Dutch Blue & Sunflower cardstock
Moonstruck, Dutch Blue, Tulip, Clover Meadow, Sunflower, Desert Sand & Black ink
Autumn Terracotta marker
Liquid Glass
Brads

Wednesday, December 16, 2009

Evensong Christmas Cards

After a crazy weekend of crafting (amid other activites), I finally have all my Christmas cards made and mailed. My only problem? I forgot to take a picture of the card I send out to most of my friends this year, so you'll just have to take my word for it that it was cute! I also used all the cards I created in my Jingle workshop, plus I needed some more, so I duplicated the Jingle workshop using Evensong papers. These I did remember to photograph, so here they are. I didn't do all the cards from the Jingle workshop because I didn't need that many, but here are the ones I did complete. I used all the same stamps and embellishments, but matched the ink colors to the paper pack. I know it's too late to inspire anyone this year (because you've all created and sent out your cards, right?), but maybe it will get you going for next year.


Sunday, November 8, 2009

Jingle Christmas Card Workshop

I just finished designing the cards for my Christmas workshop for next Saturday. Yay! We're going to be doing 20 cards, two each of ten designs. Each card features a white base, Creme Brulee cardstock, and papers from the Jingle Level 2 paper pack. Although the cards are simple, I tried to have something special on each one: Liquid Glass, ric-rac, embroidery floss, Prisma Glitter, etc. I'm really looking forward to this event. I'll let you know how it turns out!


Recipe:
December Word Puzzle, Jingle Borders, Just for the Holidays, Shining Star, Bethlehem, Say It In Style, Good Times stamp set
Jingle Level 2 paper pack
Creme Brulee & White Daisy cardstock
Juniper, Creme Brulee, Tulip, Olive & Blush ink
Creme Brulee, Tulip, Olive, Blush & Black markers
Liquid Glass
Round sparkles
Foam Squares
Circle window charms
White Daisy ric-rac
White Daisy embroidery floss
Prisma Glitter
Scallop border punch (Fiskars)

Wednesday, November 4, 2009

20 Card Set (Non-CTMH Papers)

I just finished a set of twenty cards for my mom's birthday. No, I am not giving her 20 birthday cards; I am giving her a set of cards that she can give to others. This may sound like a weird gift, but Mom loves to give cards and never has time to make any, so hopefully I am filling a need in her life. I actually made these from a template that CTMH consultant Pamela Wallace adapted from Antoinette Herrin's 20 card workshop. The whole workshop uses only 3 sheets of paper: 2 12"x12" patterned papers and 1 sheet of 12"x12" cardstock, plus 20 card bases. I plan to use this same template for a card workshop in two weeks, so I wanted to try it out first. Thanks for being my guinea pig, Mom! I didn't use CTMH papers for her set, but I will post a set using CTMH papers after I get my supplies later this week. One important thing I learned: it would be a lot easier to make 2 copies of each card design (for a total of 10 designs) rather than having to make 20 unique cards. Whew, that was a lot of work! I also doubled my appreciation of CTMH's double sided B&T papers. You can do so much more with two sheets of paper when you have a different design on each side. Feel free to let me know your favorite designs, so that I can incorporate some of these ideas into my final workshop. Thanks!

Here's the whole group of cards:


And here's a close up of them:
#1 & 2

#3 & 4

#5 & 6

#7 & 8

#9 & 10

#11 & 12

#13 & 14

#15 & 16

#17 & 18

#19 & 20