Wednesday, November 25, 2015

Rancho Simi Layout + November Single Sketch

Even though I posted the single page sketch on Splitcoast Stampers three weeks ago, I hadn't gotten around to creating a layout to go with it, so today I sat down and powered one out. Since all the photos are matted, this seemed like a good layout for a patterned paper background, so I pulled a full sheet from the Pathfinder packet and went to work. I was playing along with a Scrapbook.com stamping challenge to stamp a bird on your layout, and I can't believe I actually had a chicken stamp! I've been doing this way too long, right?

The sketch:

My layout:
Recipe:
Bingo Alphabet, Catch You Later & Today's Date stamp sets
Pathfinder Level 2 papers
Glacier, Chocolate, Barn Red, Champagne & Colonial White cardstock
Glacier, Chocolate, Barn Red & Olive ink
Olive marker
Chocolate baker's twine
Chocolate embroidery floss
Chocolate brads
Scalloped border punch (Fiskars)
Cricut Art Philosophy cartridge: tag, hearts
Pattern: Splitcoast Stampers Sketch15Nov1
Challenges: Lasting Memories Bingo / Thankful challenge - I used the diagonal row with brads, multiple photos, tag, and 2 alphas. I didn't actually use the word thankful on my layout, but I was truly thankful to sit down and rest for a while, so hopefully that counts!

Tuesday, November 24, 2015

Awards Layout + November Double Sketch

The pictures for this layout have been sitting on my desk for three weeks because I was busy with another project and couldn't find a sketch that worked for them. I finally finished my project and decided to create my own sketch, so here's the sketch and my layout. Feel free to pop on over to Splitcoast Stampers and see my other sketch for the month, too.

The sketch:

My layout:

Recipe:
Alphabet Solos "A," "W," R," "D," "S," "I" & "T" stamp sets
DCWV Summer Stack papers
Pear, Buttercup, Sky & White Daisy cardstock
Pear, Buttercup, Sky, Clover Meadow & Creme Brulee ink
Black marker (Zig)
Craft buttons
Cricut Art Philosophy cartridge: banner, stars, circles, rounded squares, "U"
Pattern: Splitcoast Stampers Sketch15Nov3
Challenges: Picture This November 1 (your choice of photos, scraps, die-cuts, buttons); Scrap Our Stash ALBUMS challenge (I chose A - Alphabet Solos stamp sets, L - layers, B- buttons & banner, U - die-cut u, M - marker, S - stars & sketch)

Friday, October 30, 2015

Awana Layout

For Virtual Scrapbook Night over at Splitcoast Stampers, I issued a challenge based on the old game of Twister. In honor of the level of physical fitness you had to exert in order to play the game, I asked everyone to see how many times they could touch their toes. If they ended up on an odd number, they had to use bright primary colors on their layout; an even number meant they had to use repeating circles. I won't tell you what my count was, but I decided to use both elements on my layout anyway.
Recipe:
Animal Cookies Level 2 papers
Clover Meadow, Tulip, Dutch Blue, Sunflower & White Daisy cardstock
Clover Meadow, Tulip, Dutch Blue & Sunflower ink
Irresistibles Lots of Dots stickers
Embroidery floss (DMC)
Cricut Art Philosophy cartridge: circles, arrows
Pattern: Splitcoast Stampers Sketch15Oct
Challenges: Splitcoast Stampers Twister challenge; Use Your Stuff die cuts and punches (used electronic die-cutting machine plus star punch); Heart 2 Heart Cricut Capers

Friday, October 23, 2015

Happy Father's Day 2013 Layout

I've been MIA on my blog this past week, but scrapbooking actually has been happening! Here's a layout I finished for another Splitcoast Stampers VSBN challenge. In keeping with the Toy Story theme, this challenge was inspired by the Etch-a-Sketch, so I asked everybody to use a sketch as a starting point for their layout. I love designing sketches, but for this layout, I chose one from Stick It Down challenge blog. The cut out corners didn't seem to work for my pictures, so I switched it to photo corners for a bolder look, and of course I didn't use flowers for Father's Day!

The sketch:
My layout:
Recipe:
Glamour Uppercase, Playful Caps, Vintage Type, June Word Puzzle & World's Best Dad stamp sets
Kraft, Chocolate, Crystal Blue & White Daisy cardstock
Desert Sand, Chocolate, Crystal Blue & Star Spangled Blue ink
Moonstruck marker
Pewter eyelets
Chocolate baker's twine
Design Shop Father Stickers (MM)
Cricut Artiste cartridge: title, tie
Challenges: Scrap Our Stash INKS challenge ( I used Ink, Number 1, Kraft cardstock & Stamping - the "patterned paper" is actually stamped using a variety of alphabet stamps)

Wednesday, October 14, 2015

Recipe for a Happy Mother's Day Layout

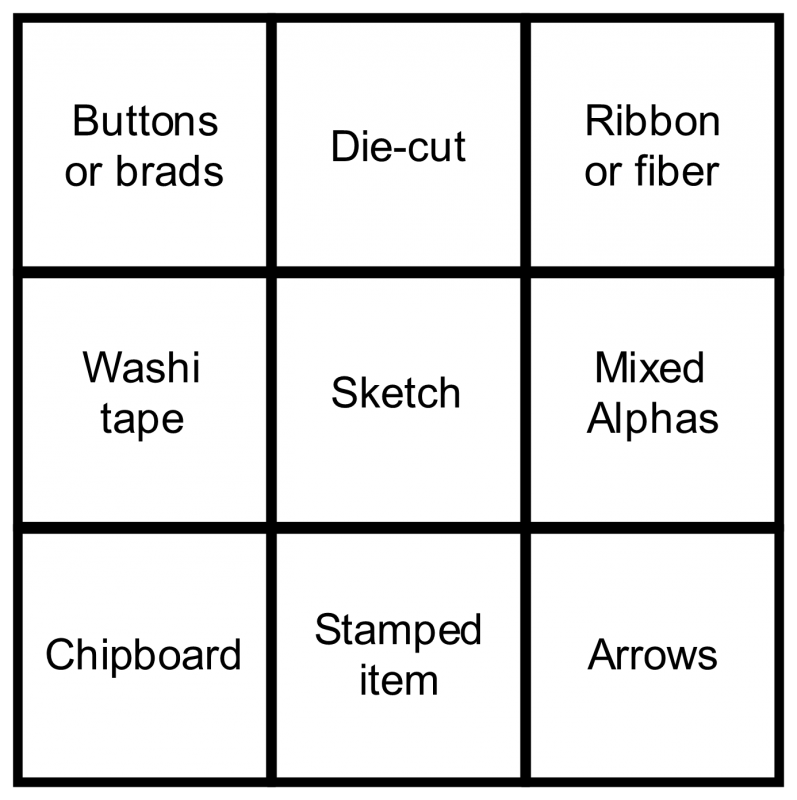
Wednesday is here, and I posted three new challenges on the Splitcoast Stampers Virtual Scrapbook Night forum for any scrapper daring enough to participate! Here's my layout for the Tic-tac-toe challenge. I used the middle column with die-cuts, a sketch, and a stamped item (several, in fact).

Here's the board, just in case you want to play along:
And my layout:
Recipe:
Say It in Style, All the Details, Whooo's Your Valentine & Have a Happy Day stamp sets
Laughing Lola level 2 papers
Laughing Lola Yellow, black, Crystal Blue & White Daisy cardstock
Black, Thistle & Flaxen ink
Black marker
Durables Artisan Studs
White ric-rac (Wrights)
White Daisy embroidery floss
Cricut Art Philosophy cartridge: title box
Cricut Artiste cartridge: hearts
Pattern: Splitcoast Stampers Sketch15Sep3

Tuesday, October 13, 2015

Pure Joy Layout

I promised you yesterday I would be sharing layouts all week long based on the challenges I wrote for the Splitcoast Stampers Toy Story VSBN, so here's another one. For the Barbie Dream House challenge, I asked participants to show us how they built their dream layout from the ground up, something I don't usually think much about, so it was fun to figure out what my process was for this layout!

My layout:

The process;
1. I started with a sketch, which strongly influenced the elements I added to the layout.
2. I had originally picked some cardstock that matched my photo colors, but when I decided to use Washi tape instead for the diagonals, I just went with the assortment I had, so my color scheme totally changed.
3. In order to add a pop of brightness to my mellow color scheme, I searched through my paper stash for a bright patterned paper to accent my photo.
4. I found a journaling card to use in place of the notepaper on the sketch, and that led me to the stickers that coordinated with the journaling card - score!
5. The black stripe on the journaling card influenced me to make the banner and journaling black.
6. I couldn't find a star on my Cricut cartridges that had just an outline, so I had to learn how to use the center point function on my Cricut to get the star cut-out. Another score!
7. I wanted a title that reflected the excitement my dogs feel when they tear around the yard full speed, so "Pure Joy" seemed appropriate.
8. My final touch was a bit of journaling, just in case others didn't get the title!

Don't forget, the challenges will all be posted this week, but you have until the end of October to complete them, so jump in any time and play along!

Recipe:
Caboodle level 2 paper
Cashmere, Black, Slate & Honey cardstock
Sorbet ink
Juniper and Slate Washi tape
My Crush Besties Assortment stickers and journaling card
3-D foam tape
Cricut Art Philosophy cartridge; banner, stars
Pattern: Stuck Sketches October 1

Monday, October 12, 2015

Love Birds Layout

Good Monday morning! For those of you who are unexcited about heading back to work this morning, here's some happy news: I have the privilege of hosting Splitcoast Stamper's Toy Story Virtual Scrapbook Night (VSBN), a week full of fun scrapbooking challenges based on childhood toys and games! I will be posting three challenges a day today through Thursday on SCS, so don't forget to check back to see a new challenge and the corresponding layout every day. Here's my first layout, inspired by the toy Fashion Plates.

To check out the challenge requirements and play along, click on this link. Not a member of Splitcoast? No problem. It's free and easy to join, and includes a personal gallery where you can post all your creations. Hope to see you there!

Recipe:
You Are My Happy & Notice the Details stamp sets
Sweethearts level 2 papers
Black cardstock
Baby Pink & Black ink
Black pigment ink
Black marker
Vellum
Clear embossing powder
DE chipboard Quotes & Hearts
Diamond Stickles (Ranger)
Baby Pink organdy ribbon
Pearl Opaques
Cricut Artbooking cartridge: lovebirds
Challenges: Clear It Out things with wings + glitter; Rochelle Spears tic-tac-toe board (I chose the row with overlay, date stamp, pearls)

Friday, October 9, 2015

SCS October Sketch + Elliot Layout

In between helping the kids clean their rooms, taking them to the dentist, and getting them haircuts, I managed to finish a layout for the Splitcoast Stampers' sketch I created earlier this week. I wanted something bold and bright to go with my son's personality, but I didn't want to overwhelm the photos, so this sketch provided a nice compromise: bold patterned paper around the edge of the layout but a single color cardstock in the center to back the photos. Feel free to play along with the sketch and post a link in the comments below so I can check it out!

The sketch:

My layout:
Recipe:
In the Background, Diverse Backgrounds & Spot On Backgrounds stamp sets
Free to Be Me level 2 papers
Red & Mint embossed cardstock
Creme Brulee, Flaxen, Glacier, Key Lime & Versamark ink
Black marker
Clear embossing powder
Irresistibles Frames & DE Signage chipboard
Nutmeg Memories chipboard (MME)
Juniper craft buttons
Cricut Artiste cartridge: title
Pattern: Splitcoast Stampers Sketch15Oct1
Challenges: Picture This October 1 challenge - 3 photos + chipboard + stamps (I stamped three chipboard pieces with Versamark ink and then used clear embossing ink to create a resist pattern - can you tell which ones?); Splitcoast Stampers Stash Buster's October week 1 challenge (I used patterned paper as my base, buttons & chipboard)

Thursday, October 8, 2015

Virtual Scrapbook Night on Splitcoast Stampers!

Hi fellow scrappers. I haven't gotten many chances to scrapbook the past few weeks because of other events in my life, but I am sure looking forward to hosting a big challenge on Splitcoast Stampers! Starting Monday, I'll be posting challenges in the Virtual Scrapbook Night forum for everyone to complete. There is a common theme that I hope you'll really enjoy playing with (okay, that was a subtle hint). If you don't have a SCS membership, it's free to join, so come on over on Monday and see a bunch of fun challenges.

Sunday, September 20, 2015

Mug & Muffin 2013 Layout

I'm finally getting around to using the double page sketch I created for Splitcoast Stampers last month, just in time for a new one to be posted! Oh well, enjoy this one until I get a layout done for the next one, or you can check out the new sketch here. I tried a new technique for this layout: ink splats. The results weren't outstanding, but at least I figured out how to use the CTMH spray pen I bought over a year ago but never took out of the package. I had stamped flowers on some White Daisy cardstock, but the white seemed too stark compared to the geometric patterned paper I was using, so I sprayed some Cocoa ink onto the cardstock, and then decided to do the same for my title box. Probably should have sprayed ink onto other parts of the layout, but I was afraid of ruining it, so that will have to wait for another layout when I'm feeling braver! Off to watch some Youtube videos on the topic. . .

The August double sketch:

My Layout:
Recipe:
Rustic Flowers, Frame It Up & Hodgepodge Alphabet stamp sets
Elemental Level 2 papers
Honey, Sky, Pacifica & White Daisy cardstock
Honey, Sky, Pacifica, Pear & Cocoa ink
Pacifica marker
White Daisy grosgrain ribbon
Green epoxy bubbles
Pear craft button
White Daisy embroidery floss
Art Philosophy cartridge: scalloped border, title box, &
Pattern: Splitcoast Stampers Sketch15Aug3
Challenges: Lasting Memories ink splatters with mixed alpha/fonts; Heart to Heart ink or paint splats (I used ink); Scrap Our Stash LAYERS challenge (I used L - leaves, A - alphabet stamps, Y - yellow cardstock, E - epoxy bubbles + embroidery floss + Elemental paper, R - ribbon, S - scalloped border)